Showing posts with label Tricks. Show all posts

SocioFluid


Do you want to have a Cool Bookmark on your blog? Go to SocioFluid ,it is a Dock Site Bookmark,

How to get Dock like Bookmark on your blog?

Go to SocioFluid and generate your own Website you want to add on your bookmark dock.


See Sample Image:
Click to see Full size,


Try this Sample Below:

Image Reflection


Here is a great tool for creating faded reflections for your images. 
You can upload an image from your computer or any image hosted on the internet. 
Either way, you'll get an amazing looking picture.
It can give your web pages more depth, which is always a good thing. Also, you can decide how big you want the reflection to be. Here I gave about a 50% reflection size for the image on the left.
Pls. be patient,its lil bit Slow...to generate your image

Round Image Generator


Do you want to have a cool pictures with round sided?well click browse and enter your own image then click Round it! button


Image:
or URL:

How to implement on your blog?
Log in to your Blogger account
Go to "Design" > "Page Element"
Click on "Add a Gadget" > "Html/Javascript"
Now paste this Code below inside the box.


<form action="http://www.roundpic.com" method="post" enctype="multipart/form-data" target="blank"><input value="1048576" name="MAX_FILE_SIZE" type="hidden"><table><tbody><tr><td class="title"><b>Image:</b></td><td class="input"><input name="file" type="file"></td></tr><tr><td class="title">or <b>URL:</b></td><td class="input"><input value="http://" name="url" type="text"></td></tr><tr><br /><td colspan="2" class="submit"><button onclick="getLoader();" type="submit">Round it!</button></td></tr></tbody></table></form>
 Preview first then Save.

Google Buzz


Do you want to have a Google buzz in your Blog?
ok Follow my instructions...

Log in to your blogger account
go to "Design" > "Edit Html"
Now find this piece of Code below
<data:post.body/>
Immediately before that paste this code
<div style="float:right;padding:4px;">
<a title="Post on Google Buzz" class="google-buzz-button" href="http://www.google.com/buzz/post" data-button-style="normal-count" data-locale="en_IN" rel="nofollow" expr:data-url='data:post.url'></a>
<script type="text/javascript" src="http://www.google.com/buzz/api/button.js"></script>
</div>
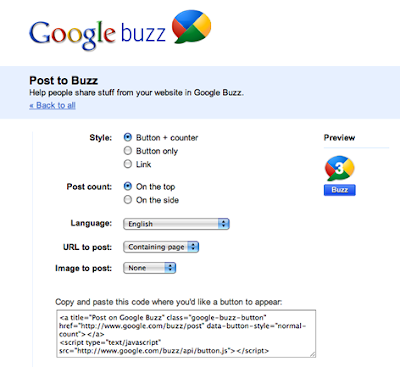
*If you need a smaller compact button, then change normal-count to small-count in the code.
*If you want to show the button on the left rather than on the right, then change float:right to float:left  in the code


Random Post


This Widget creates a link for your template that directs users to a random post when clicked on.

How to implement on your blog?
Log in to your Blogger account
Go to "Design" > "Page Element"
Click on "Add a Gadgets" > "html/javascript" Paste this code below on the Box.


<div id='myluckypost'></div> <script type='text/javascript'> function showLucky(root){ var feed = root.feed; var entries = feed.entry || []; var entry = feed.entry[0]; for (var j = 0; j < entry.link.length; ++j){if (entry.link[j].rel == 'alternate'){window.location  = entry.link[j].href;}}} function fetchLuck(luck){ script = document.createElement('script'); script.src = '/feeds/posts/summary?start-index='+luck+'&max-results=1&alt=json-in-script&callback=showLucky'; script.type = 'text/javascript'; document.getElementsByTagName('head')[0].appendChild(script); } function feelingLucky(root){ var feed = root.feed; var total = parseInt(feed.openSearch$totalResults.$t,10); var luckyNumber = Math.floor(Math.random()*total);luckyNumber++; a = document.createElement('a'); a.href = '#random'; a.rel = luckyNumber; a.onclick = function(){fetchLuck(this.rel);}; a.innerHTML = 'View Random Post'; document.getElementById('myLuckyPost').appendChild(a); } </script> <script src='/feeds/posts/summary?max-results=0&alt=json-in-script&callback=feelinglucky'></script>
 After you Done it then Save.

Show/Hide Contents


How to Implement to your blog?
Log in to your Blogger account
Go to "Design" > "edit html"
Find this piece of code
</head>
Immediately Before that paste this code
<style type="text/css">
.commenthidden {display:none}
.commentshown {display:inline}
</style>
<script type="text/Javascript">
function togglecomments (postid) {
var whichpost = document.getElementById(postid);
if (whichpost.className=="commentshown") { whichpost.className="commenthidden"; } else { whichpost.className="commentshown"; }
} </script>

How to use on your post?
<a aiotitle="" href="javascript:togglecomments('hideshowdemo')">+/- Click Here to Expand and Collapse</a>
    <div class="commenthidden" id="hideshowdemo"><ul>
    <li><a href="Your Url">Link Name</a></li>
    <li><a href="Your Url">Link Name</a></li>
    <li><a href="Your Url">Link Name</a></li>
    </ul></div>
Change The Url and Link Name With your Own...

Language Translator for Blogger


If you are having a blog and receiving visitors from various countries and cities of the world, then they may or may not be comfortable with the language of your blog. So adding a translator button or a widget is always useful.


Two options to add a translator:
I.
Log in to Blogger
Go to Layout and then Add a Gadget -> HTML/Javascript
Now copy and paste this code in to it:
 Source: Google
<div id="google_translate_element"></div><script>
function googleTranslateElementInit() {
new google.translate.TranslateElement({
pageLanguage: 'en'
}, 'google_translate_element');
}
</script><script src="http://translate.google.com/translate_a/element.js?cb=googleTranslateElementInit"></script>
Then Save.

II.

Log in to Blogger
Go to Layout and then Add a Gadget -> HTML/Javascript
to get the code, Click this MyDataNest
and paste to the "html/js" then save.

Google Buzz Buttons [With Share-Counter]


Instructions to add these official Google-Buzz buttons (to Blogger Blogs):
STEP #1
Visit this page: Google-Buzz Stuff
Click on the link "Post To Buzz" and in the next page,
select the type of button you want to use on your blog.


URL To Post       - Containing Page
Image To Post     - Let it be None.


STEP #2
Log in to Blogger, go to Layout -> Edit html and tick the tick-box "Expand Widget Tempaltes".
And find (CTRL+F) this code in the tempalte:
<data:post.body/>
Immediately Before that paste this code below,
<!--BUZZ-STARTS-->
<div style='border:0px !important;text-align:right;margin-top:-42px;'>
Google Buzz Code Here</div>
<!--BUZZ-STOPS-http://youtrickz.blogspot.com-->
Make sure to change the Google Buzz Code with the code you got from the step 1
Then Save.

Auto Highlight


Here you will see how to make a Auto Hightlighter for your blogs or websites.
See Instruction on how to implement on your blog...


Login to your dashboard--> layout- ->Page Elements
Click on 'Add a Gadget' on the sidebar.
Select 'HTML/Javascript' and add the code given below and click save.
<textarea rows="5" cols="15" onfocus="this.select()" onmouseover="this.focus()" style="display: inline;" name="txt" onclick="this.focus();this.select()">Put your Contents right here</textarea>

Note : Remember to replace Enter Your Content Here with your real content.


Blog compatible to Mobile Phones


Blogger is now ready on your phone
how to implement to your blog?follow the simple steps below...


Sign into your Blogger account > Design > Edit html
Find this piece of code 

<b:include data='blog' name='all-head-content'/>
Immediately below that paste this code 

<meta content='IE=EmulateIE7' http-equiv='X-UA-Compatible'/>
<b:if cond='data:blog.isMobile'>
<meta content='width=device-width, initial-scale=1.0, user-scalable=0' name='viewport'/>
<b:else/>
<meta content='width=1100' name='viewport'/>
</b:if>

Save the Changes!
That's it! Now, your visitors can access your blogger blog through mobile phones.

Social Bookmarking Widget For Blogger


With the release of Cute Box Blogger Template some useful blogger widgets which includes a Bookmarking Widget For your blog’s homepage created. This widget helps readers to bookmark your blog’s homepage on their favourite bookmarking services like Google bookmark, Stumbleupon, Delicious, Digg etc. It contains icons from our Circular Style Social Media Icon Set. This is how this widget looks like,

To add this widget to your blogs, follow these steps,

Go To Blogger > Layout
Click Add a Gadget or Add a Page element
Choose HTML/JavaScript
Inside HTML/JavaScript paste the code below,

<center><tr><td valign="top" width="50%">
<table border="0" cellpadding="0" cellspacing="0" width="222">
<tbody><tr><td width="28" height="30"><img border="0" width="25" src="https://blogger.googleusercontent.com/img/b/R29vZ2xl/AVvXsEhOtTaW9JPHDxnOmJtCb_r6aucZyPhzoSjcx1elbv4Zq7VKx3P111FlqSvxTfCP7cbG5nhxqJh6YOONmp3TPbdrhq8HBGz6kZ2aSlmW8Etu-CU9Xs3_qv584xXplQzE6iLibgopRMj44IQ/s400/FACEBOOK.png" height="25"/></td>
<td height="30"><a href="http://www.facebook.com/sharer.php?u=http://YOUR-BLOG-NAME.blogspot.com" target="_blank" rel="nofollow">Share on Facebook</a></td>
</tr><tr><td height="30"><img border="0" width="25" src="https://blogger.googleusercontent.com/img/b/R29vZ2xl/AVvXsEiL1ySt_u5NmFSydUUWMTAvpDH0yfu2uSQJQzP47ah62P5uuIdW9Zn9nHza4hWoZZ_nJL8AwGHdWc9BSKFhsxp5LqmceJnRzy_YFmn2_ZI9Vxp8MZqo4UfraaNNidb1nMAQxCr-3JJd5ig/s400/TWITTER.png" height="25"/></td>
<td height="24">
<a href="http://twitthis.com/twit?url=http://YOUR-BLOG-NAME.blogspot.com">Share on Twitter</a></td>
</tr><tr><td height="30"><img border="0" width="25" src="https://blogger.googleusercontent.com/img/b/R29vZ2xl/AVvXsEjd2LA9j3dsJbTQVZ952QpTFy6hOM5CIDY0z51VsRXIwX-XOfSRJpU5p_rWKo4FTt1tO0PRp_gm-H7ADVQRp8L__RFgE2xgnkysNN6yYFB3tR2aLPTRukcf1x4VzNbBFIoo5u-she9t0gE/s400/STUMBLE-UPON.png" height="25"/></td>
<td height="30"><a href="http://www.stumbleupon.com/submit?url=http://YOUR-BLOG-NAME.blogspot.com" target="_blank" rel="nofollow">Share on StumbleUpon</a></td>
</tr><tr><td height="30"><img border="0" width="25" src="https://blogger.googleusercontent.com/img/b/R29vZ2xl/AVvXsEg3Wgpz-5mJtCjWWlIK_-9ZGR22uJLnNcz1gErY0XYospsZx5iNzpUVeYWTLo5IMa_YRGIIoRfFiQMIKTWHZCXQftdP9KhqHc-7bGtdelpEe8Kbzz-hoBkyXzGh_U7YrjzfiGiVQgL17jU/s400/DELICIOUS.png" height="25"/></td>
<td height="30"><a href="http://del.icio.us/post?url=http://YOUR-BLOG-NAME.blogspot.com" target="_blank" rel="nofollow">Share on Delicious </a></td>
</tr></tbody></table></td><td valign="top" width="50%">
<table border="0" cellpadding="0" cellspacing="0" width="222">
<tbody><tr><td width="28" height="30"><img border="0" width="25" src="https://blogger.googleusercontent.com/img/b/R29vZ2xl/AVvXsEiCnoKtUhmvSFLSs0IGJc6Rzm6pR3gQOy08SIjN-TuExeE1Qax8c3Y8vFWTFQTq33XesmFv_iy9etO_iuNl6_RXDQido04xVMZU12xONO6WQwQCRiT9pUYwli5lvY5IinP4Dr6k9j1MVA8/s400/DIGG.png" height="25"/></td>
<td height="30"><a href="http://digg.com/submit?phase=2&url=http://YOUR-BLOG-NAME.blogspot.com" target="_blank" rel="nofollow">Share on Digg </a></td>
</tr><tr><td height="30"><img border="0" width="22" src="https://blogger.googleusercontent.com/img/b/R29vZ2xl/AVvXsEgjbN7E_pGUVUw09tzgI9PhrbceOSSFXCaJ2MjRj14SLe0H6k1Oh4v7yjk9QG-zZhVRxhKKfMMXjvBB62dLZp07iYBPXMw4tsn2jcPWDqnjPSe30Ux4IOAfYpwFhTWEzERbtGjz3bWyPbE/s400/Google-icon.jpg" height="22"/></td>
<td height="30"><a href="http://www.google.com/bookmarks/mark?op=edit&amp;output=popup&amp;bkmk=http://YOUR-BLOG-NAME.blogspot.com" target="_blank" rel="nofollow" title="Bookmark this blog on Google">Bookmark on Google</a></td></tr><tr><td height="30"><img border="0" alt="Email" width="21" src="https://blogger.googleusercontent.com/img/b/R29vZ2xl/AVvXsEg4e5SEKwZGmLJAklGC-5karUIQGlailLgpXVpEK-embwFuUehJZVGGhlVsJtk1Jl3Y5ZZch4G4qYQ7hCr6X2jy2TAgztAcNo1YY6zfvvnc2E5e1b-rNdh93GsEdH-mueaaq80dP1sBtJZk/s400/Email+Orange_128.png" height="22"/></td>
<td height="30"><a href="http://feedburner.google.com/fb/a/mailverifyuri=tntbystc&amp;loc=en_US" target="_blank" rel="nofollow">Receive Email Updates</a>
</td></tr></tbody></table></td></tr></center>
Remember to replace YOUR-BLOG-NAME  with your Blog’s good name and the Subscription Link i.e http://feedburner.google.com/fb/a/mailverifyuri=tntbystc&amp;loc=en_US with your own Feedburner subscription link.

You can find your subscription link by going to the following location in your feedburner account, Publicize > Email Subscription . Just below Email Subscription page you will find a code as shown below,

Finally save your widget and preview your blog to see the new change!

Disable Right Click


Sign in to your Blogger dashboard > layout
Add a Page element > html/javascript

Copy Code below and paste on html/js box
<SCRIPT language=JavaScript>
<!-- http://www.spacegun.co.uk -->
    var message = "Sorry...the work is copyrighted";
    function rtclickcheck(keyp){ if (navigator.appName == "Netscape" && keyp.which == 3){     alert(message); return false; }
    if (navigator.appVersion.indexOf("MSIE") != -1 && event.button == 2) {     alert(message);     return false; } }
    document.onmousedown = rtclickcheck;
</SCRIPT>

You can change the text in red color,with your own text.
Then save.

ColorBox Effect

First of all, log in to your blogger account
Next go to Edit html
Back your templates before doin this effect ok.
Now Find this piece of code
</head>
Immediately before that paste this code


Then click


For pictures format: (Change rel"Example2,example3,example1,)
 <a href="http://i36.tinypic.com/nosp4x.jpg" imageanchor="1" rel="example2" title="Marylou on Cumberland Island" style="margin-left: 1em; margin-right: 1em;"><img border="0" height="283" src="http://i36.tinypic.com/nosp4x.jpg" width="420" /></a>
Click this image to see Demo:


For Video format: (remove "/watch/v=")
Click this link to see Demo:
Carino Brutal - Skapshock
<a class='youtube' href="http://www.youtube.com/v/Q021grFmB4s" imageanchor="1" rel="example2" title="Your title" style="margin-left: 1em; margin-right: 1em;"><img border="0" height="283" src="Your Image url" width="420" /></a>

For Inframed page format:
Click link below to see Demo:
<a class='iframe' href="http://www.google.com/">Google Inframed</a>

Remove Blogger Navbar

Fist log in to your Blogger account
click on Design,click on Edit Html Tab

Before you try this make sure to backup your templates just incase.
Now find this piece of code

/* Variable definitions


Immediately before that paste this code below
#navbar-iframe {
display: none !important;
}

Then click Preview first,
Then hit 

Lightbox Image Effect

Log in to Blogger,
Go to Layout -> Edit HTML tab
Backup your Template first
Find this code on your template
</head> 

Immediately before that paste this code below:
<!--LIGHTBOX-IMAGES-STARTS--><link rel="stylesheet" href="http://files.main.bloggerstop.net/uploads/3/0/2/5/3025338/lytebox.css" type="text/css" media="screen" />
<script type="text/javascript" src="http://files.main.bloggerstop.net/uploads/3/0/2/5/3025338/lytebox.js"></script><!--LIGHTBOX-IMAGES-STOPS-->

Then click Save.

For Picture format:
<a href="http://TARGET_ADDRESS_OF_THE_IMAGE.jpg" rel="lytebox"><img src="http://SOURCE_ADDRESS_OF_THE_IMAGE.jpg"></a>

Demo:


Credits to Bloggerstop.net

Blogger Favicon


Log in to your Blogger account
go to Edit html
make sure to back up your templates first
Now find this code
</head>
Immediately before that paste this code below

<link href="Your Favicon URL" rel="shortcut icon"></link>

Change the Link in Red with your Icon
Preview it first
Then Save.

Bouncing Icons

Log in to your blogger account
Go to Edit Html
Make sure to back up your templates first okies
Now find this code
</head>

Immediately before that paste this code
<!--BOUNCING-ICONS-START-->
<link href='http://files.main.bloggerstop.net/uploads/3/0/2/5/3025338/screen2.css' media='all' rel='stylesheet' type='text/css'/>
<script src='http://code.jquery.com/jquery-latest.js' type='text/javascript'/>
<script src='http://files.main.bloggerstop.net/uploads/3/0/2/5/3025338/execute.js' type='text/javascript'/>
<!--BOUNCING-ICONS-STOP-Help-http://bloggerstop.net-->

Next Find this
<data:post.body/> 

Immediately After that paste this
<!--SOCIAL-BOOKMARKING-BUTTONS--><br/>
<b:if cond='data:blog.pageType == &quot;item&quot;'>
<center>
<ul id='nav-shadow'>
<li class='button-color-1'><a expr:href='&quot;http://twitter.com/home/?status=Currently reading-&quot; + data:post.title + &quot; &quot; + data:post.url' target='_blank' title='Tweet This Post'/></li>
<li class='button-color-2'><a expr:href='&quot; http://www.stumbleupon.com/submit?url=&quot; + data:post.url + &quot;&amp;title=&quot; + data:post.title' target='_blank'/></li>
<li class='button-color-3'><a expr:href='&quot; http://www.facebook.com/sharer.php?u=&quot; + data:post.url + &quot;&amp;title=&quot; + data:post.title' target='_blank'/></li>
<li class='button-color-4'><a expr:href='&quot; http://digg.com/submit?url=&quot; + data:post.url + &quot;&amp;title=&quot; + data:post.title' target='_blank'/></li>
<li class='button-color-5'><a expr:href='&quot;http://del.icio.us/post?url=&quot; + data:post.url + &quot;&amp;title=&quot; + data:post.title' target='_blank'/></li></ul></center>
<a href="http://bloggerstop.net/2009/10/bounce-share-social-bookmarking-widget.html" target="_blank"><span style="font-size: x-small;">Get this widget</span></a>
</b:if>
<!--SOCIAL-BOOKMARKING-BUTTONS-http://bloggerstop.net-->

Then Save.

Dancing Links and Pictures

Log in to your blogger account
Go to Edit Html
Make sure to Backup template first
Now find this code
</head>

Immediately before that paste this code
<!--DANCING-NUDGE-LINKS-STARTS-->
<script src='http://code.jquery.com/jquery-latest.js' type='text/javascript'/>
<script type='text/javascript'>
$(document).ready(function() {
$('a.nudge').hover(function() { //mouse in
$(this).animate({ paddingLeft: '20px' },400);
}, function() { //mouse out
$(this).animate({ paddingLeft: 0 }, 400);
});
});
</script>
<!--DANCING-NUDGE-LINKS-STOPS-http://bloggerstop.net-->

How it works?
For links
<a href="Your URL" class="nudge">Text Here!</a>
Move Mouse Here!

For images
<a href="Image URL" class="nudge"><img src="Image Url"/></a>

How to install MyBlogLog on Blogger?


  1. First, make a full backup of your blog template by going to Template>Edit HTML in your Blogger dashboard, then clicking on the "Download full template" link near the top of the page. It is always good practice to do this before making any adjustments to your blog's template in case you make a mistake and need to revert back to a working template afterwards!
  2. Next, go back to the Edit HTML section of your dashboard, and check the "expand widget templates" box. Then, just before the closing </head> tag in your template, insert the following lines of code:


    <script src='http://blog.merlinox.com/MrX/Blog/test/myBlogAvatar2.js' type='text/javascript'/>
    This will link to the javascript used to power the comment avatars which is hosted by Merlinox.
  3. Next, you will need to find the following line of code:


    <b:loop values='data:post.comments' var='comment'>
    This will be in the comments section of your template, and is easily found using the search function of your browser (CTRL+F). If you cannot find this line, this is probably because you have forgotten to expand the widget templates!
  4. Right after this phrase, add the following section of code:


    <div style='border:0;float:left;margin: 0 5px 0 0;'>
    <script>
    myBlogAvatar('<data:comment.id/>','<data:comment.authorUrl/>');
    </script>
    </div>
  5. Now, save your template and take a look at one of your blog posts which has a few comments. You will see that any commenter who has a MyBlogLog account and avatar will now have their image featured beside their name. Those who do not have a MyBlogLog account will feature the default question mark avatar instead.
As you have read, this is quite an easy hack to implement in your blog. This will enable MyBlogLog comment avatars for your comments, even if you are not a member of MyBlogLog yourself!

Google Custom Fonts For Blogger


For years, Bloggers and web-designers were using those simple web fonts to style their blogs and templates. They didn’t had an option to change those fonts as there were only some fonts accepted world-wide as web fonts. It was impossible to use another fonts on web pages as they would appear in ten monitors in ten different styles ! Their appearance may change in  respect of the change in the OS, softwares … etc of that computers. So web-designers were trapped under those countable fonts…
But now Google has launched their new service Google web fonts with the slogan – ‘Making the Web Beautiful!’. This service will allow you to use custom fonts on google font directory on our blog/ websites without any sign-up or anything else. As it’s from ‘Google’, It doesn’t have any complications and it’s also completely free for commercial and private use.,No restrictions held or no harsh laws. This could make your blog look more stylish and is applicable for blogger blogs too. Don’t get amazed, It’s True ! I’ll show you how to do it with blogger.
Back-up Your blogger template
It’s always the first step for any blogger tutorial. I’ll be using this step as the first step for all my tutorials on allblogtools. You should always take a back-up of your blogger template before testing any hacks on blogger.
For this, go to Design or layout -> Edit HTML -> Download full template
Select your Font
For this, Go to Google Font directory and select any one of those stylish font, which you want to use on your blog.
Get the Code for your Font
In this tutorial I’ll be using the Tangerine font, Which I liked the Most. For this just click on the name Tangerine and a new windows will open. Select The tab named ‘Get the code‘.
Add the Code to your Blogger template
Now you have to copy the Code they provide and you have to add the code to your blogger template, just after
<head>
tag of your blogger template.
The code may look something like;-
<link href='http://fonts.googleapis.com/css?family=Tangerine'
rel='stylesheet' type='text/css'>
Important : ?Please add a Forward slash (“/“) before the the end of the tag (“>”) of this code. i.e, The above code should look like ;-
<link href='http://fonts.googleapis.com/css?family=Tangerine'
rel='stylesheet' type='text/css'/>
This is because blogger use XML for coding which won’t allow unclosed tags like this. So you have to close this tag by adding the forward slash.
Now Copy the code and paste it just after
<head>
It should be the first code after the
<head>
Section. Otherwise it could cause problems while displaying the text in IE and may be in Firefox.
Please remember to add the forward slash before the end tag. and now please click Save Template

now the code required for Google web font has been added to your blog. Now you have to can use google fonts in your blog by applying it on any widget tags.
Add the CSS code for Font to your Blog
 
Now the last and final step. In this step, you have to specify where you want to add the font and have to add the css code for it.
If you want to make the font appear for a specific sentence only in your blog post, then use the HTML code ;-
<div style="font-family: 'FontName', serif;">Your text</div>

in the above code change
FontName : to the font name that you chosen it from google.
Your text : to any text you want.
If you want the font to appear for your
  • Blog titile
  • Post title
  • post body
  • sidebar fonts
you have to add the CSS code for it. Don’t worry, It’s very very easy.
Here I’ll tell you How you can change your post title. For this you have to search for the title css code
.post h3
or
.post-title h3

This is the common css code for post title in blogger. now we have to add the css code for the new fonts for this code,. For this, add/modify these lines below the above codes.
font-family: 'Your Font Name';
The code should look something like ;-
.post h3 {
font-family: 'Your Font Name';
}
Here I had added the css code for Tangerine. You should post the css code between the “{” and “}” tags of .post h3. Like wise you can add the css code for other position too by modifying the css code.
Here i’ll mention the main positions and the common css code for each position. Please note that it may change if you are using any custom template.
  • Title : h1
  • Post title : .post h3 or .post-title
  • Post font : .post-body
  • Sidebar : .sidebar h2
the above tags helps you to change the font for any position of the above 4 tags.
for example, if you want to change the post font,
in the above table, you can see that the tag to edit for the post font, is .post-body
so you have to search for .post-body in your template, and below it, add the following line.
font-family: 'google Font Name';
the final code should looks like
The code should look something like ;-
.post-body {
font-family: 'Your Font Name';
}
These above values may change in some custom themes. But these are the common seen tags. If you didn’t find the tags with this, try searching similar tags.
Sign up for FREE daily Updates.