

Irfanview is a very good free image editor which can be very useful for bloggers working with images. I used it very frequently especially to edit and upload screenshots to my posts,
What and how do I use Irfanview for my blogs? Well, very frequently, I need screenshots to better explain what I want I have in mind. (I refer to screenshots below because I mainly work with screenshots. The same methods apply to photos, etc.) To do that, in the particular page, I press the key Printscreen, open Irfanview, click Edit in the menu bar and choose Paste, and the screen image appear in its editor window. With this method, the cursor will not be displayed. If I want the mouse cursor to be shown on a particular spot to draw attention to it, I first go to the screen I want pasted, go to Irfanview, press C, and a pop-up will appear. I select the relevant options, make sure "Include mouse cursor" is ticked, click start and I will be taken to the previous screen. I then press ctrl+F11 (the key is configurable, but F11 is the default. It can be changed but I have no reason to change it), and I will be taken back to Irfanview with the screen in the image editor window with the mouse cursor in the spot where I last left it.
I can also highlight a spot by drawing a circle around it. Unfortunately, Irfanview does not have that feature. For that, I have to use Paint which comes with Windows (under Accessories)
Cropping
If I want only a particular section of the screen of the screen to be included, I drag and drop the mouse in that section. a broken-line box will surround the section. I click on Edit in the menu bar and select "Crop selection" and the rest of the screen will disappear, leaving only the section. I then save the file, usually in jpg format (there is a huge selection of formats to choose from in Irfanview). I then upload the screenshot into the post.
Add text
If I want text to be displayed in certain section of the screnshot, I drag and release to highlight that section of the screenshot I want the text to be displayed, click Edit in the menu bar, select "Insert text into selection", a pop-up will appear with a box for me to type in the text. There will be other options such as choose font, alignment left, center or right, etc. When I am finished, I just click OK and the text will appear in the screenshot.
Highlighting particular section of the screen with Paint
When I want to draw attention to certain section of the screen, such as putting a circle or a rectangle around a section of the screenshot, it unfortunately can't be done in Irfanview. I first save the file. I then open Paint available in the Accessories section of Windows. I open the file in Paint. I first select the color of the ellipse I want it to be, usually red by clicking on the square of color in the palette at the bottom of Paint. Then I select the icon for ellipse in the toolbar on the left side of Paint. I then drag and drop the mouse over the section I want to highlight, and an ellipse will surround that section. To see an example of a screenshot with a portion of it highlighted by a red ellipse, surf over to Generating simple graphic header using Irfanview photo editor (click "BACK" button to return to this page). If I am not happy, I click Edit in the menu bar and select Undo, and the ellipse will disappear. I repeat again until I am satisfied. I then save the file

(the default format in Paint is bmp. I normally change it to jpg). The screenshot is then ready for upload to the post.
Resizing image size
Frequently, we have to resize images so that they will fit into the space we want them to display, etc. This can very easily be done in Irfanview. In Paint (which I seldom use) the choices are to resize in percentage, which can be problematic if you need the width to be in exact pixels. In Irfanview, just click Image in the menu bar and select Resize/resample, and a pop-up will appear. There are many choices (pixels, cm., inches, percentage). You can see the choices in the screenshot below
(click to enlarge):
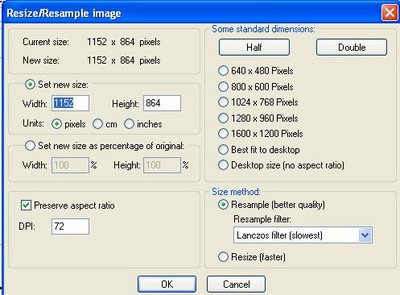
If, for example, you want to resize the image so that the width do not exceed the width of the column, enter the pixels into "width", leave the "height" alone and tick "Preserve aspect ratio". The height will be automatically set to keep the image from being distorted. You can then either save the image to be uploade in its original size or just use the figures in the width="" height="" attributes in the <img> tag. (Note: if you are using the <img> tag, you only need to enter the attribute width="X". If the height attribute is left out, the resulting image will automatically be scaled so as to keep the aspect ratio constant).
Save or convert picture into many different formats
With Irfanview, you can save or convert your picture into very many different formats. I am using the Irfanview 3.98 version. There are already a few upgrades which I didn't bother with, and I wouldn't know if there had been any changes in the number of file formats. For the version I have, there are altogether 19 choices which I list below:Irfanview 3.98
bmp Windows bitmap
ecw Enhanced compressed wavelet
emf Enhanced Windows metafile
fsh EA Sports format
gif Compuserve gif
ico Windows icon
jp2 JPEG 2000 format
jpg JPEG files
jpm JPM format
ldf LuraDocument format
lwf LuraWave format
pcx Zsoft Paintbrush
pbm Portable bitmap
pgm Portable graymap
png Portable Networks Graphics
ppm Portable pixelmap
raw RAW image data
tga Truevision Targa
tif Tagged image file format
The ico format will be useful if you intend to add a Favicon for your blog.


0 comments:
Post a Comment